1. Prepping for Meeting
Navigation: Global Overview > Settings > Meetings

Note: There are pre-populated Meetings message templates that can be viewed by clicking on the View icon.
|

1.1. Add Agenda Template
Any Agenda templates created on the Global overview will pull through to your Meeting for all the communities.
Note: Global templates can be modified per community on the Meetings card. |
Click on the Add Agenda Template.

A pop-up window will appear where the Agenda description/ name, e.g. BC AGM Template can be entered

On the right side of the screen, now add the agenda items for the template by clicking on Add Agenda Item
![]()
When adding an item, a pop-up window will appear where you will enter the agenda item title and if applicable a description.

Important: DO NOT number the agenda items. When the agenda pulls through on Meeting, the solution will automatically number each item. |
Example:  |
2. Manage Meeting
Navigation: Community > Planner and Compliance Dashboard

Select the specific meeting compliance item.

2.1. Edit Meeting Details
To edit the meeting details, fill in the description and select the date.

- Title: Meeting name
- Description box: Insert the Meeting description
- Date & Time: Confirmed meeting date and time
- Location: Add the GPS coordinates or Location Pin
- Link to Online meeting: Add the Zoom or Teams Link
2.2. Add Agenda Template
Navigation > Meetings > Agenda
Either add a Single Agenda item or the Agenda template that was created on the Global Overview, by clicking on + Add Agenda Item


Note: Any Agenda Item can be modified/ removed, based on the community by selecting the item to edit or selecting delete in the menu options
|

2.2.1. Uploading Supporting Documents on Agenda points
(Supporting documents such as previous meeting minutes or budgets)
Click on the agenda item, on the pop-up window, scroll down to drag and drop the document to upload, or click on Browse to select the file.

If the wrong document was uploaded, simply click on the trash can next to the document or preview and or download the document.

Note: Once a document has been uploaded, this will be indicated with the following icon  |
2.2.2. Set up a poll for voting
To add a poll simply click on the menu options button and select Add Poll

A pop-up window will appear to enter the criteria and details of the voting poll.

- Poll Title: Name of Voting Poll
- Poll Description: Description of what is being voted on
- Poll Options: The options the owner/ trustees need to vote on
- Max Selection: How many options may be chosen
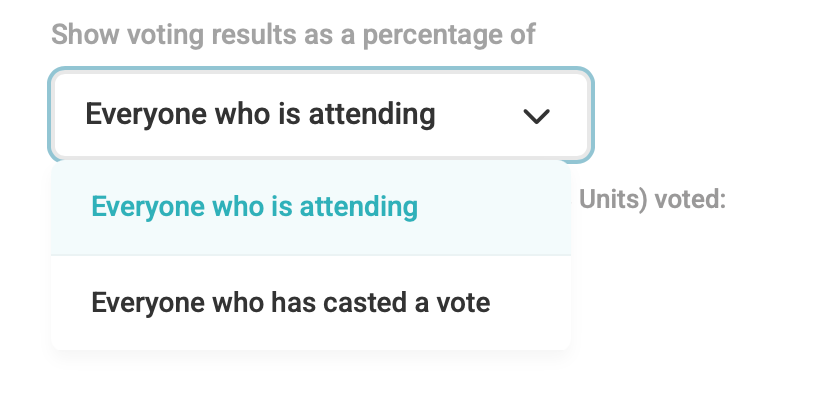
- Voting Percentage: By default, percentages are calculated as follows:
- By Attendance. (Sum of PQs or unique owners cast for an option)/ (Total PQs/unique owners attending).
- You can now toggle an additional setting on each poll: Calculate percentage by Total Votes Cast. (Sum of votes for an option) / (Total votes actually casted).
Example: Let's say:
Here's how the percentage differs based on your selected method
|
Note: Once a poll has been set up, the following icon will indicate this, and the poll results will display on the card.
Multiple polls can be created on an agenda item |

2.3. Participants
Navigation: Meeting > Participation

2.3.1 Second Owners
If a unit has two owners, both owners will pull through as participants in the meeting. Co-owners do have voting rights and will therefore be able to vote on behalf of the units they are associated with. If both owners of a unit is present and attempts to vote, the last vote casted will be counted towards the poll results.

2.3.2 Adding External Participants
On the Participant page, scroll down and click on the Add External Participant button.

Complete the external participant's details in the pop-up window.

Note: Should any participant details pull through incorrectly, please navigate to the unit details page and correct the customer and owner details before sending out the invitation. |
2.4. Assigning Proxy
Once the PM receives the Proxy forms, it can be done immediately under the participant page.
Navigation: Meetings > Participants > Menu Option > Assign Proxy

If a proxy has been assigned it wil indicate in Yellow from and to which proxy

If an external participant is assigned a proxy, add the External Participant and assign the proxy to them. A yellow dot will show a proxy has been assigned.

2.5. Remove Voting Rights
Navigation: Meetings > Participants > Menu Options > Disable Voting
Owners handed over may not vote, so the system allows to remove voting rights. The owner can participate in the meetings but will not have the permission to vote.
Disable voting is disabled based on unit - thus if a single owner owns multiple units, and all their units should not be able to vote, all relevant units should be marked as disabled.

This will be indicated with indicated in red next to the owner's name.

2.6. Uploading Supporting Documents for the Meeting
(Documents such as Nomination forms)
On the far right of the screen, click on Documents or click on Browse to select the file to upload

These documents will be added to the invitation as additional documents. These documents will be available to select as attachments when invitations are sent.
2.7. Sending out Invitation
Navigation: Meetings > Participants > Menu Options > Send Invites
To send out the Meeting Invitation and circulate the agenda pack, send out the invitations

A pop-up window will appear showing how many participants will receive the invitation there is a option to include SMS. On the same pop-up, add a short message and attach additional documents that will be sent out with the Meeting Invitation.
An example of how the Invitation will look is as follows with all agenda attachments if PDF stitched in one PDF document which that forms part of the AGM Pack as well as the additional support documents.

An example of how the agenda will look is as follows with all agenda attachments as well as the additional support document.

Was this article helpful?
That’s Great!
Thank you for your feedback
Sorry! We couldn't be helpful
Thank you for your feedback
Feedback sent
We appreciate your effort and will try to fix the article