We are excited to introduce the new Supplier Invoice page and AI Invoice Assistant, designed to make managing supplier invoices more efficient than ever. This can be managed on a Global & Community Payments Page.
1. Manage Supplier Invoice Page
Navigation: Global Level > Finance > Suppliers > Invoices
The screen below will be where all Supplier invoices will be managed. This includes recurring ( Variable & Fixed ) and ad-hoc.

Important: The Month selector at the top of the page will determine which supplier invoices are displayed on the screen. Please ensure that you are working in the correct calendar period.
|

The screen below will appear with the next three tabs: Overview, Drafts, Created, and Unmatched. On this page, the processing of the invoices will be done.
- Overview: List of ALL invoices
- Drafts: Invoice which require either a Source document, Invoice number
- Created: Invoice which has been captured and created successfully
- Unmatched: Invoice uploaded via the AI Assistant which requires manual input.
1.1 Overview Tab
The Overview page will have a card for each community that displays a summary of each community's invoices. The date at the top indicates which month the invoices are currently being viewed. Simply adjust the date at the top of the page to view upcoming invoices. (Please note this tab will only appear on the Global Level, and not in the Community Level).

Each card represents one community and provides a summary of its supplier invoice activity for the month selected. Each card should display:
- Ready: The number of drafts ready to be created for the selected month.
Example: "2 Ready" - Not Ready: The number of drafts that are not yet ready for creation.
Example: "1 Not ready"
A Small Progress bar with a percentage showing the % of total invoices created for the month. If there is a total of 20 recurring instances, and only 10 have been created, then the percentage will be 50%.
For quick navigation, click on one of the text that states "Not Ready" on the card, and the draft page will appear where the filter is already applied.
For example: If you click on the 1 Not Ready on 4 Dawill Street card, then it should go to the drafts page and apply the filter of Community: 4 Dawill Street and Status: Not Ready |
Another method for quick navigation is to apply filters by clicking on the filter icon top right corner.

Filters available are as follows:
Community: A Multi-select dropdown allowing you to select one or more communities.
Supplier: Type in the Supplier name or Supplier Code.
Invoice Type: Recurring and Ad-hoc. When selected, the card details (Ready, Not ready, Created, Expiring) will only reflect the selected invoice type.
Status: Ready, Not Ready, Created, Expiring. When a status is selected, the view will display all communities that have at least one instance matching the status.
The Search bar allows for quick location of the invoices based on key details. Any of the following search fields can be searched.
- Community Name
- Supplier Name/ Code
- Ledger Name/ Code
- Supplier and Our reference

1.2 Unmatched Tab
The Unmatched list view displays all invoices scanned by the AI Invoice Assistant where a Community, Invoice date, or Supplier could not be identified. This view is where all invoices which requires manual input will be displayed.
Each invoice card will indicate the date on which the invoice was scanned by the AI Assistant.

As well as the following information:
- Invoice date
- Supplier Reference
- Ledger Selection
1.2.1. Preview Invoice Card:
Click on any card in the Unmatched list. The selected invoice will open in a pop-up
- Review the uploaded file
- Enter or correct missing details (e.g., community, supplier or date)
- Save, or create the invoices as needed
Note: The Unmatched list will always show the same results regardless of which month is selected in the page date picker. This ensures you can always find unassigned or incomplete invoices without filtering by date. The list is automatically sorted with the most recently scanned documents displayed first (from newest to oldest) Once missing details are completed and the invoice is successfully matched, it will move out of the Unmatched list. |
1.3 Draft Tab
The draft page displays all recurring and ad hoc invoices that have not been created for the month as per the month picker. Sorted according to date (earliest in a month till latest). Change the date to view future invoice drafts.
All draft invoices are grouped by Community.

1.3.1. Draft Card
Each draft invoice is displayed as a payment card, and should display the following information:
- Invoice Type
- Invoice date
- Supplier Code and Supplier Name
- The first two ledgers, or "Ledgers required" if missing
- Amount
- Reference: Display both Supplier Reference and Our reference, or "Reference Required" if missing

Important: A warning icon will appear next to the Supplier Reference if a duplicate is detected. |
1.3.2. Types of Draft Invoices
Each draft invoice will display a label indicating its type:
- Variable - Created via Recurring Supplier invoice
- Fixed - Created via Recurring Supplier invoice
- Ad-hoc - Created via Manual Supplier & AI Invoice Assistant

1.3.3. Draft Status
A status label of Create will display on each draft if the draft is ready for creation. A draft invoice will display Create if the following required fields are completed:
- Amount
- Description
- Ledger
- Our Reference
- Supplier Reference

However, on each invoice setup, supplier invoice requirements can be added:
- Source Document field
- Supporting Documents
If all applicable fields are completed, the status will display as Create.

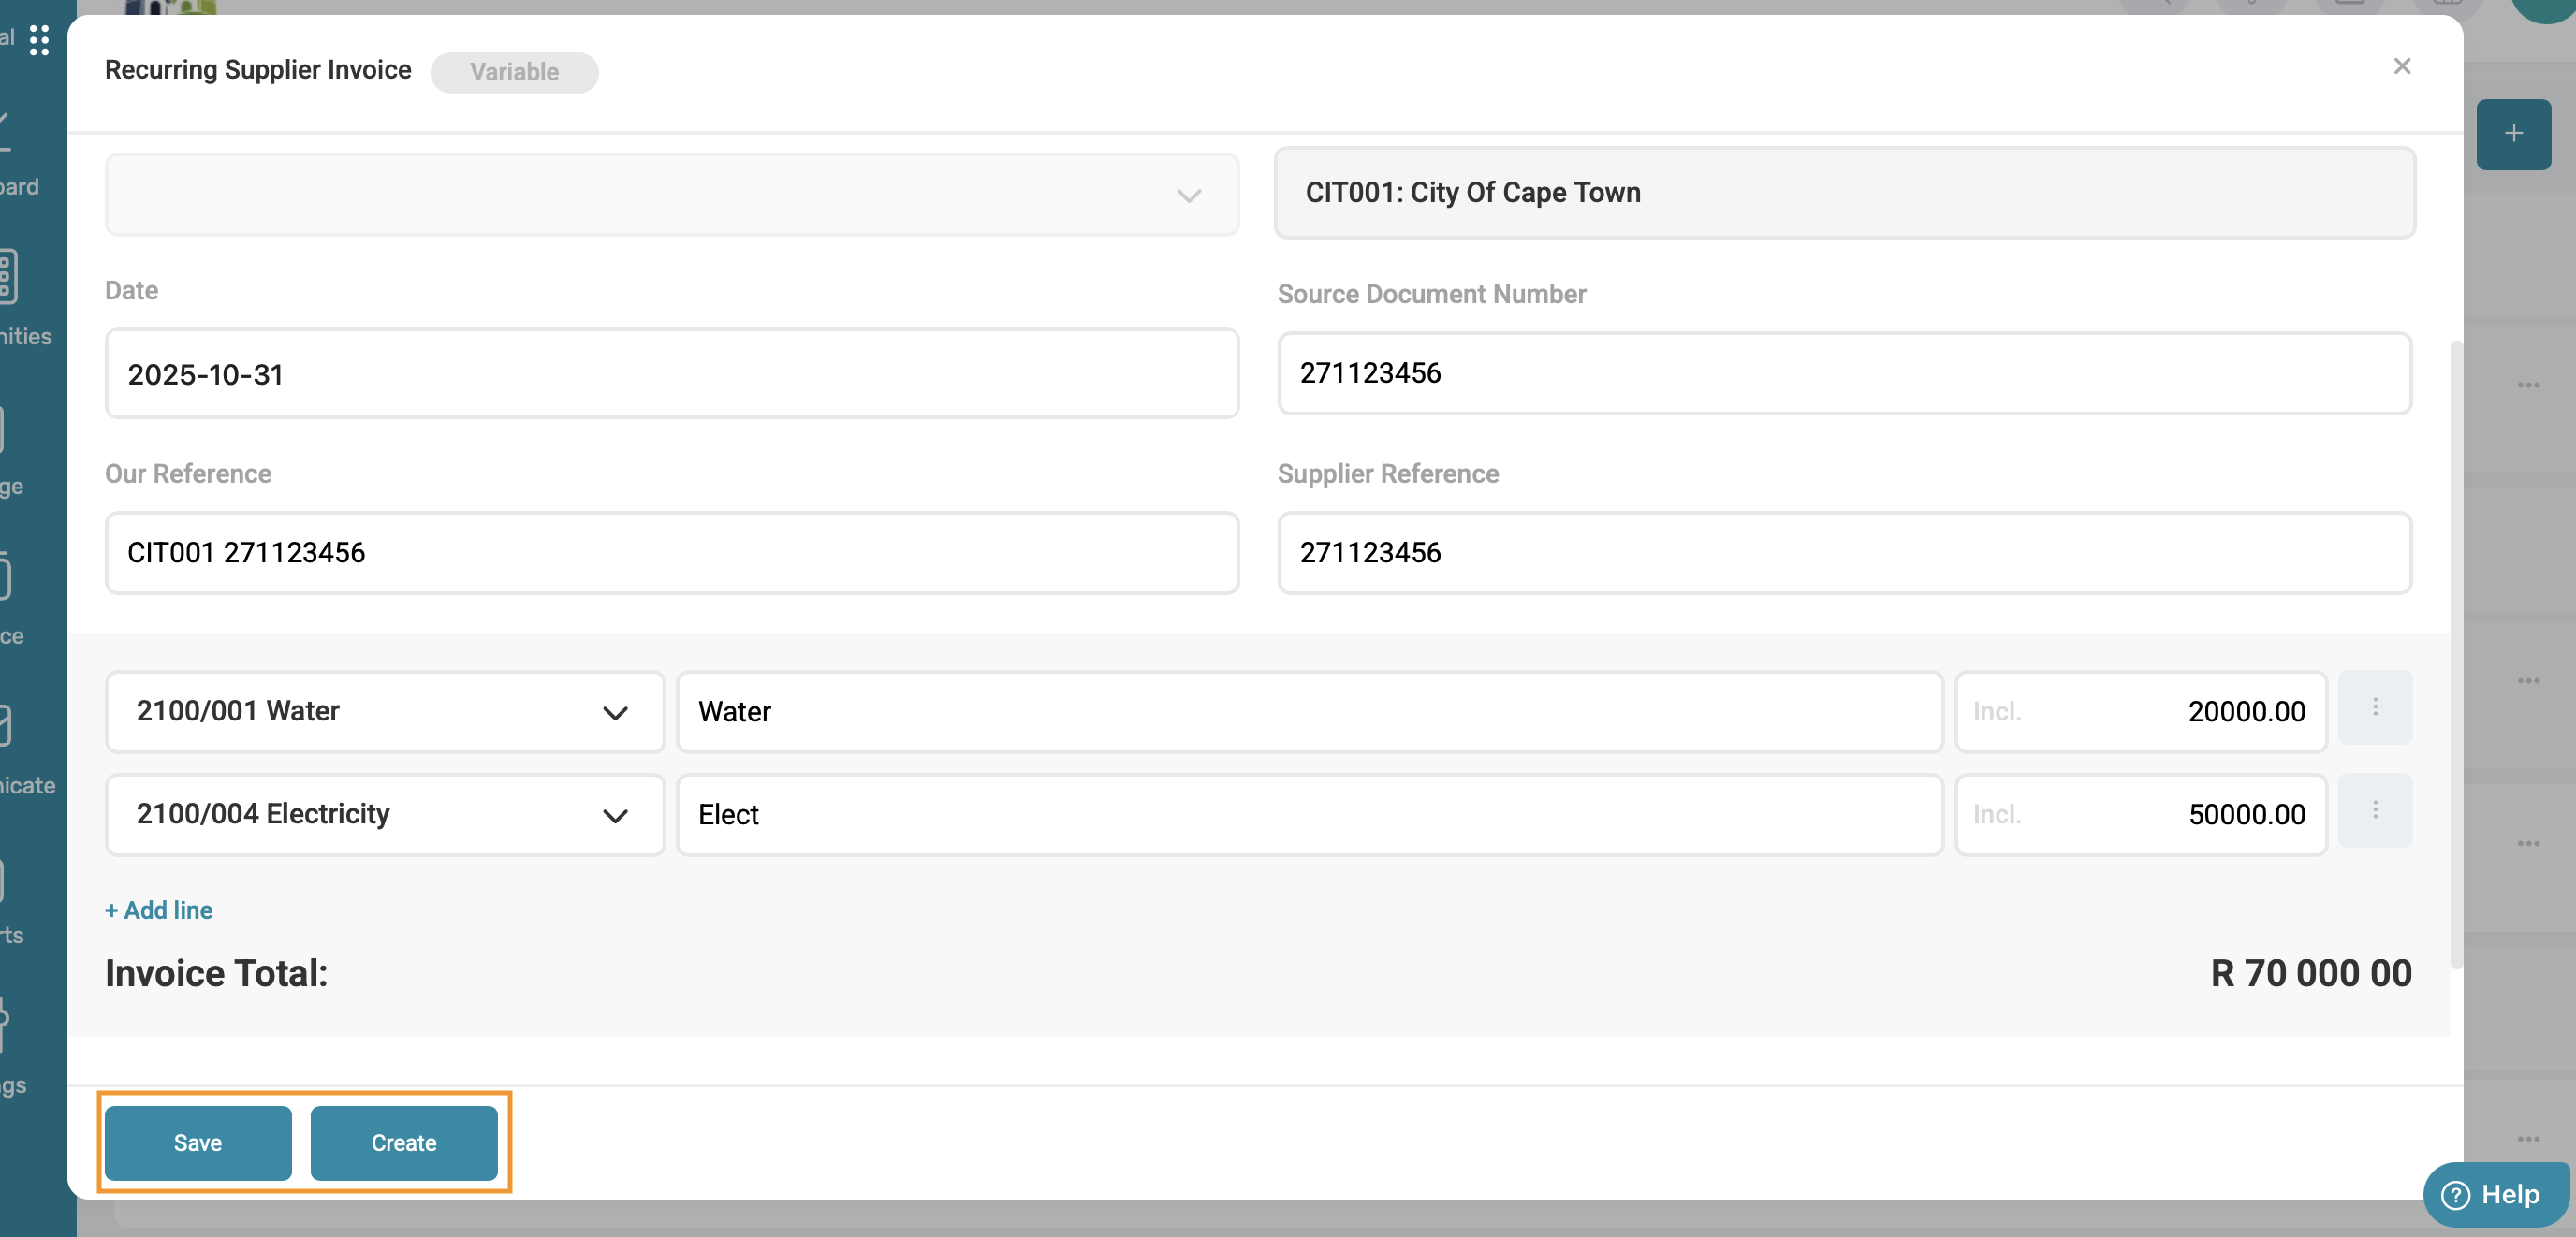
To create the invoice, click on the card a pop-up will appear. Depending on the invoice type, certain fields can be edited:
Variable: Our reference, Supplier Reference, Amount, Ledgers, Description, Add line item, and Supporting Documents.
Fixed: Description, Source Document Number, Our Reference, Supplier Reference, and Supporting Documents.
Ad-hoc: All fields, including Supplier and Community.
Either click on Save to be able to add to the invoice at a later stage if needed, or click on Create if the invoice is ready to be created.
Next to each card, a tick box is displayed, which will be tickable if the card has a Ready status; if the card does not have a Ready status, the tick box will not be able to be ticked for creation.
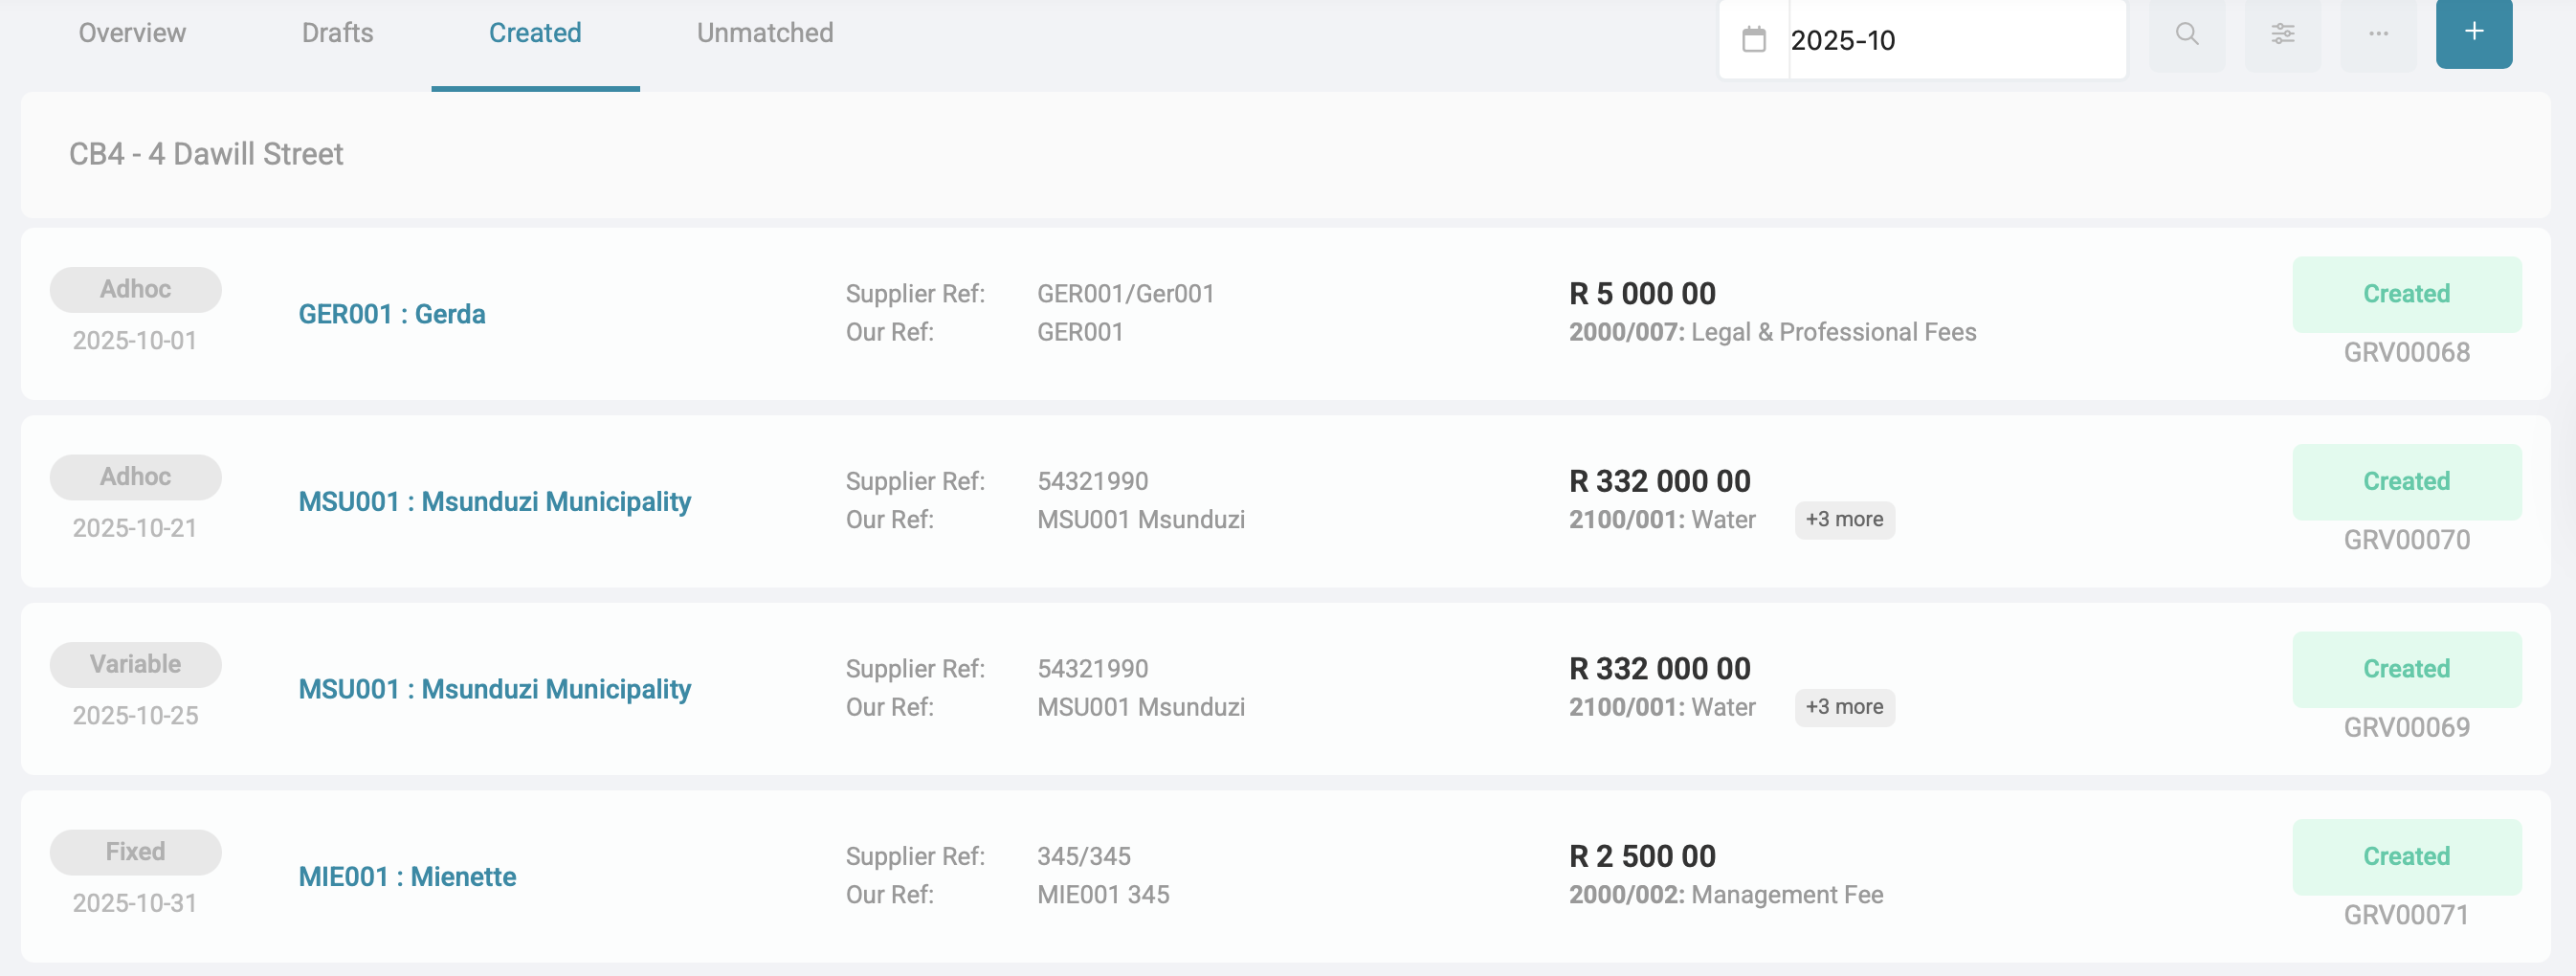
1.4. Created Tab
Created tab displays all invoices that have been created for the month selected. This page will display all created recurring and ad-hoc supplier invoices for all communities. No changes can be made to created recurring invoices.
| Important: Use the month selector dropdown menu to select the desired period. The solution will display all invoices created within that selected month. |
Each invoice card should display the following information:
- The invoice label indicates whether the invoice is Variable, Fixed, or Ad-hoc, as determined on the setup.
- Invoice date: The date the invoice was created.
- Supplier information: The Supplier Code and Supplier Name.
- References: Both the Supplier Reference and Our Reference fields are displayed as captured during the invoice creation.
- Ledgers: The first 5 ledgers are linked to the invoice, as per the creation.
- Invoice Amount.

| Note: The "Created By" and "Created On" details will appear in the Document Report for additional reference. |
2. Add Supplier Invoices
Navigation: Global Level > Finances > Supplier > Invoice > '+' (Add)

There are two options available to create Supplier invoices:
- Standard Supplier Invoicing
- Ad-hoc Invoice - Manually capture and create a new supplier invoice.
- Import Bulk Invoices - Upload multiple invoices at once using the Excel Bulk Invoice template.
- AI Assistant Invoicing
- Upload Files - Using the AI Invoice Assistant to process PDF and Word Document containing invoices. This can only be done for Bulk upload invoices.
2.1. Standard Invoicing
2.1.1. Ad-hoc invoice
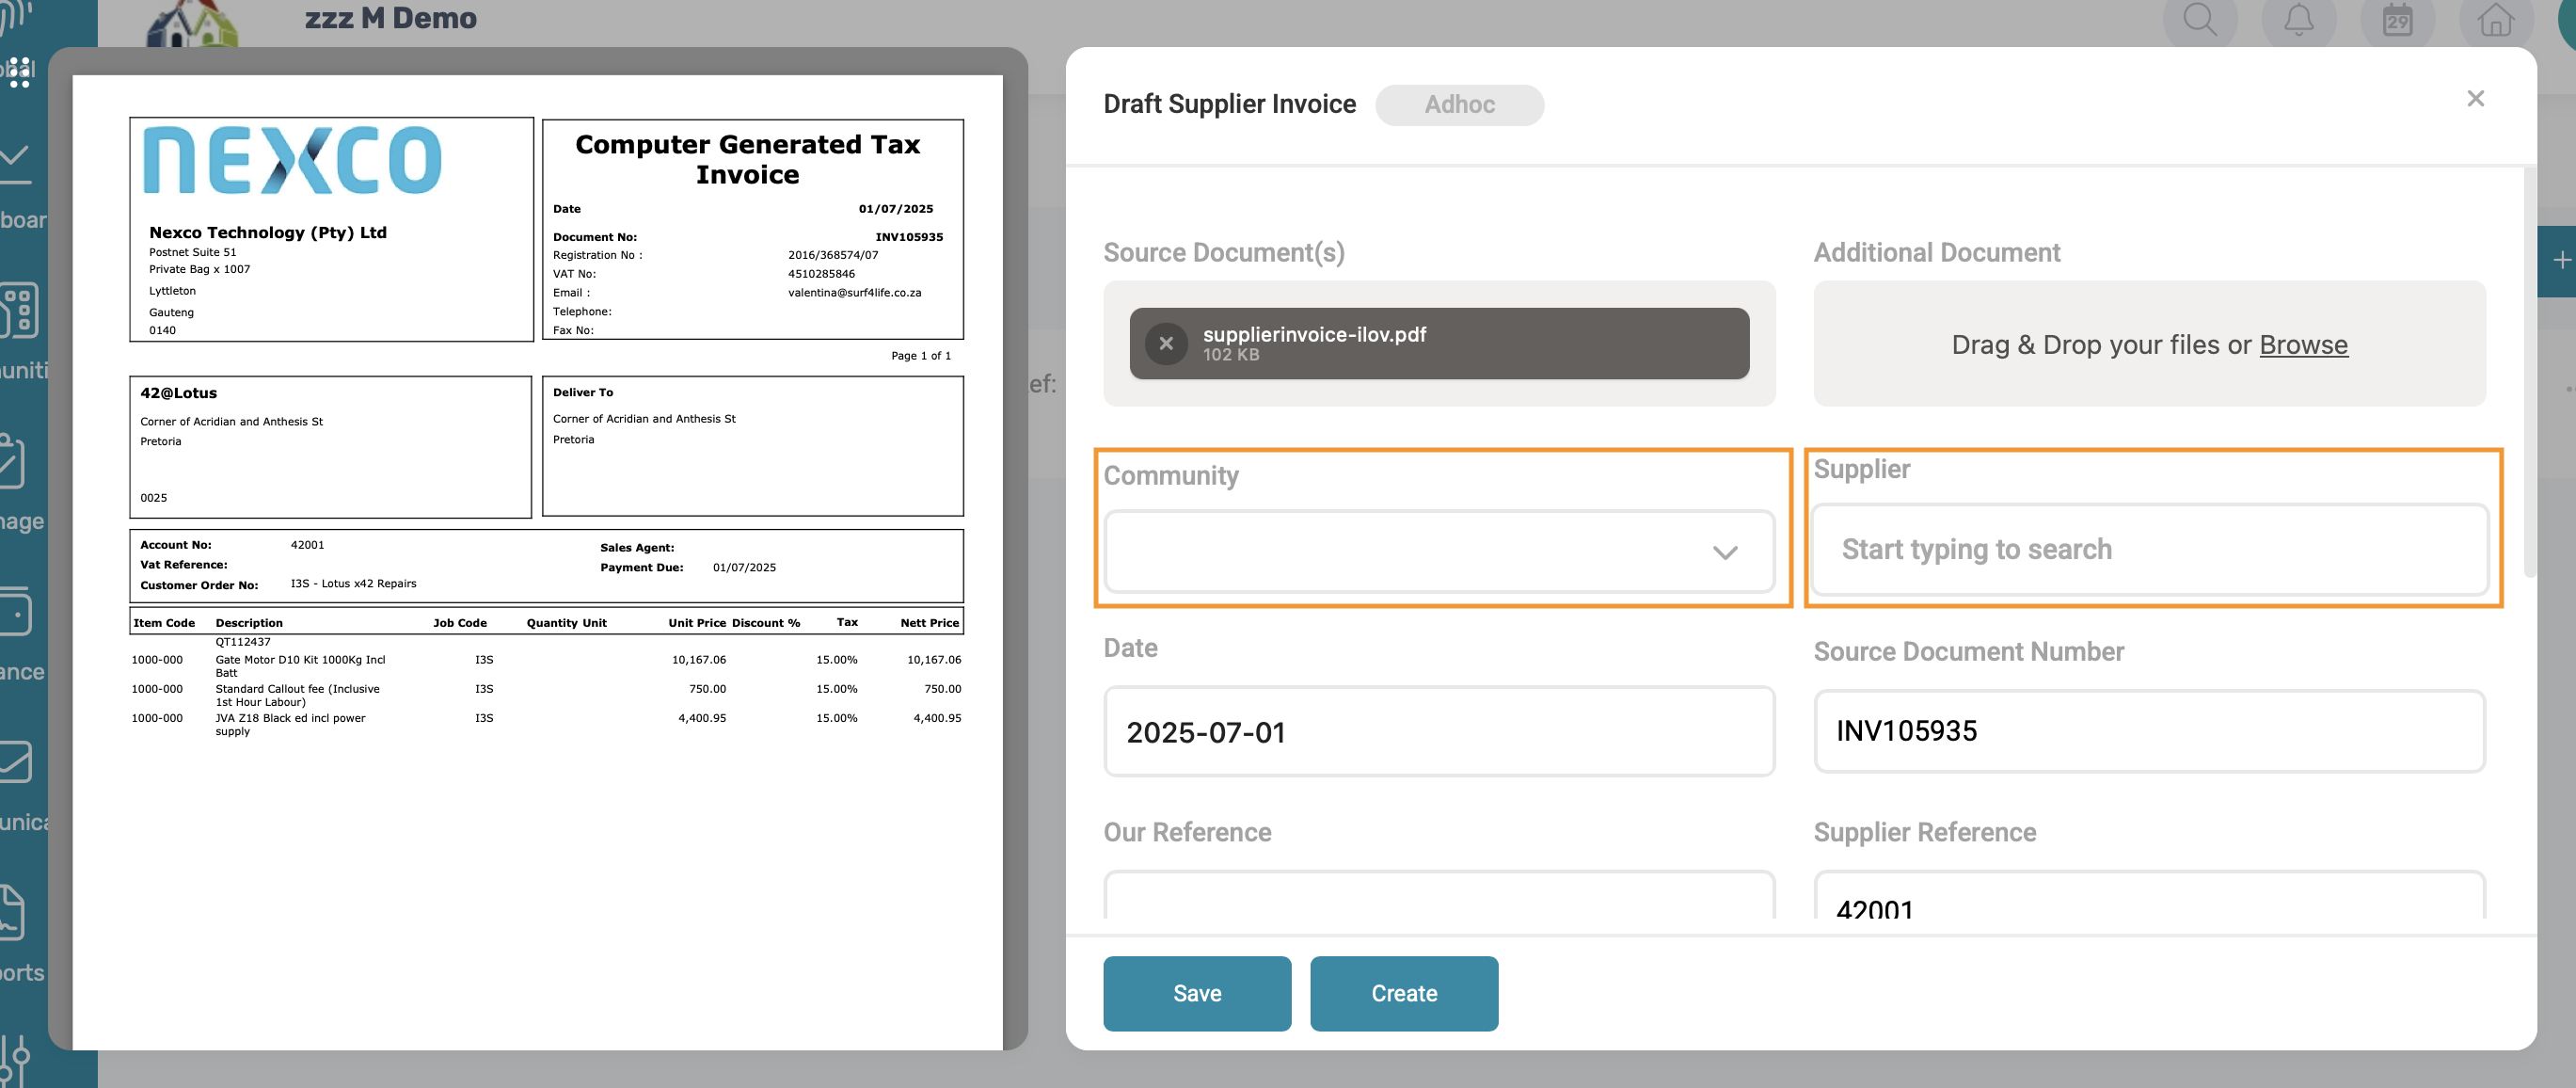
On the right-hand side, click on the '+' button. A pop-up will appear where the details for an ad-hoc invoice will be captured manually.

| How to make use of the Invoice Preview Function: on the pop-up screen click on > drag and drop or browse to upload the individual supplier invoice. It will display the supplier invoice on the left side of the screen. |
Manually Capture the following fields:
- Community: Select the Community in which the invoice should be processed.
- Supplier: Select the supplier as per the invoice received - the supplier must be verified.
- Date: Select the invoice date.
- Our reference: Best practice would be to use the supplier code hyphenated to the invoice number received:
- e.g., SUP001 - INV001 - this will allow for automated allocation of supplier payments.
- Supplier reference: the reference that will reflect on the supplier's bank statement.
- Invoice line items: with selected ledgers, description, VAT if applicable, and amount.
- Upload Files: This comes in handy when Trustees need to authorise payments and they can view the original invoice. Only two supporting documents can be uploaded.
At the bottom of the pop-up, two options are available:
- Save as draft: Saves the input as a draft. This does not create an invoice on the Solution yet.
- Create: Finalizes and creates the invoice (GRV), which will pull to the Payments page.
| Note: Drafts can be edited or completed later. Once an invoice has been created, it will follow the standard approval or posting workflow. |
2.1.2. Excel Bulk Invoice Template
Navigation: Global Level > Finance > Suppliers > Invoices > Menu Option > Import Bulk Invoices

Download the template by clicking on the Download bulk invoice template option in the pop-up screen.

An Excel document will be downloaded, which will look similar to the following.

- Column A: Insert the relevant community code
- Column B: Insert General Ledger Code - example 2000/007
- Column C: Insert Date in format yyyy/mm/dd - format the cell to text first
- Column D: Supplier Code on WeconnectU.
- Column E: Amount (VAT incl.)
- Column F: Description of invoice
- Column G: Our reference. Best practice would be to use the supplier code hyphenated to the invoice number received"
- e.g., SUP001-INV001 - this will allow for automated allocation of supplier payments.
- Column H: Supplier reference the reference that will reflect on the supplier's bank statement.
- Column I: VAT (Y/N)
- Column J: Source Number optional - this is the invoice number
Once all the relevant information has been added, please save the Excel document and upload it on the pop-up screen.

Note: You CANNOT add any additional files. Following these steps, the Solution will assume this upload is for bulk creation. |
Once the file has been uploaded, a summary will appear reflecting all the invoices that will be uploaded from the Excel file.

Once again at the bottom of the pop-up, two options are available:
- Save as draft: Saves the input as a draft. This does not create an invoice on the Solution yet.
- Create: Finalises and creates the invoice (GRV), which will pull to the Payments page.
2.2. AI Invoice Assistant Invoicing
The AI Invoice Assistant is designed to simplify and automate the supplier invoicing process by scanning uploaded documents then generating draft invoices based on the extracted information. This can be done for bulk invoice uploads.
How to make use of the AI Invoice Assistant: On the right-hand side is a '+' button > once this button is clicked > a pop-up screen will appear > drag and drop or browse to upload an entire folder of invoices.
2.2.1. Bulk Supplier Invoices Upload
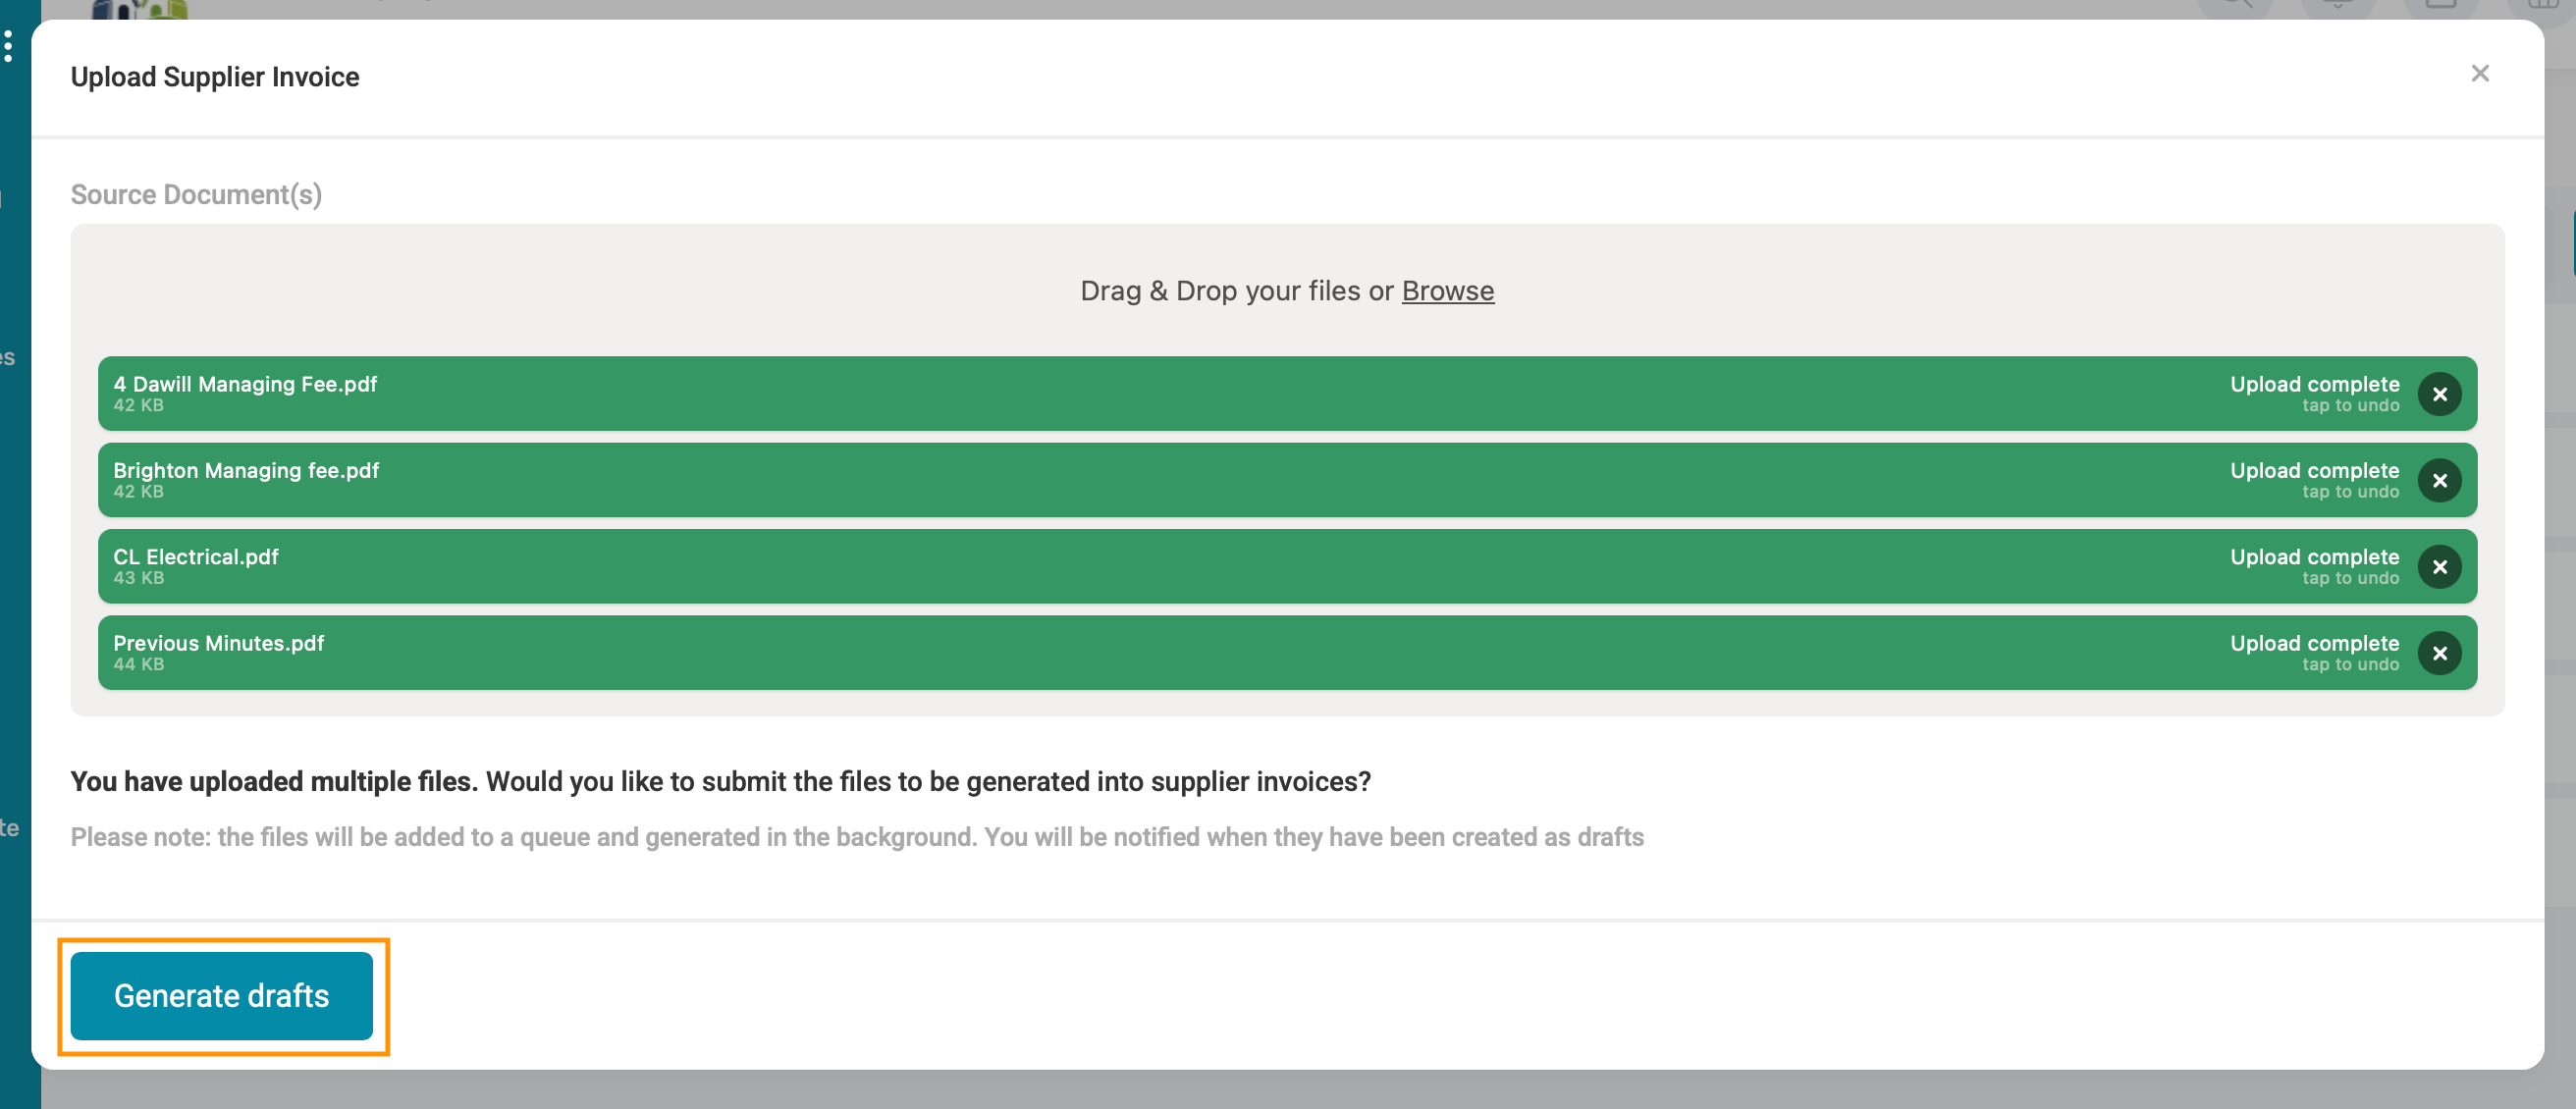
On the right-hand side is a '+' button > once this button is clicked > a pop-up screen will appear > drag and drop or browse to upload > Selected multiple invoices.

| Important: Excel files CANNOT be uploaded to the AI Invoice Assistant. |
Click on Generate Draft and the Solution will automatically recognise that the AI Invoice Assistant is going to be utilised
After the Generate Drafts option was selected the AI Invoice Assistant will start processing the draft supplier invoices into a batch. To view the batch, click on the menu options button and select Previous Batches

Notice how the status bar keeps moving, this is to indicate that the AI Invoice Assistant is still processing. On the far right in the blue it will also indicate how many of the invoice has already been processed.

| Note: You are able navigate away from the invoice page while the AI Invoice Assistant is busy processing the payment batch. Files are queued for processing, and draft invoices will be automatically be created once the queue is complete. |
3. Previous Batches
Navigation: Global Level > Finance > Suppliers > Invoice > Menu Option > Previous Batches

A list of previously uploaded batches will display. Each batch will show:
- Date of batch loaded
- Community Name
- Uploaded by
- Batch amount
- The number of invoices included in that batch.

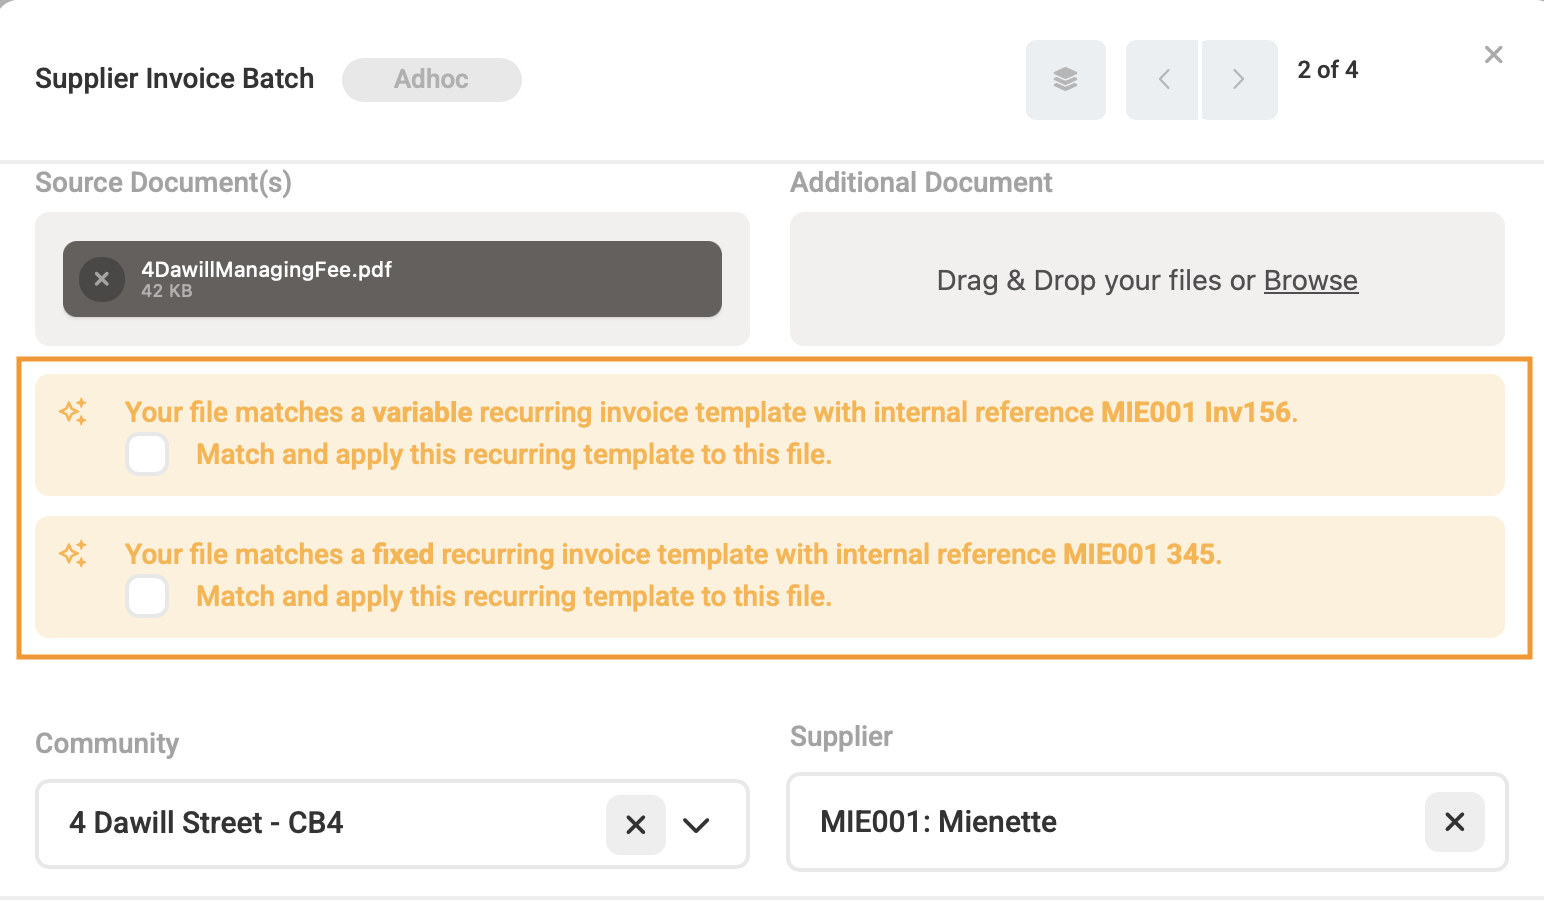
Once a batch is opened by clicking on a batch card, navigate through the draft invoices to review all draft invoices which has been created. The batch may contain unmatched items (invoices that could not be automatically matched), or draft Invoices.

For each supplier invoice file within the batch, the Solution will display all input fields that could be identified from the uploaded document.
- Our Reference is automatically populated with the Supplier Code.
- Source Document Number is extracted directly from the invoice number displayed on the document.
- Supporting Document: The uploaded file will automatically be attached as the Source Document to the generated draft invoice for ease of reference.
Before proceeding, review and edit these fields to ensure the information is correct.

Note: If an invoice from the batch has already been created, the Solution will automatically display the GRV number. Duplicates: When saving a draft from a previous batch, the Solution automatically detects if a recurring invoice template has been set up for that supplier. If a template is found, you will have the option to apply the recurring template to the current file.
|
4. Creation of Invoices
Navigation: Global Level > Finance > Suppliers > Invoice
Draft Invoice can either be created individually or in bulk. The Bulk Creation function creates multiple invoices at once. Before invoices can be created in bulk, it must be in "Ready" status.
| Note: Only invoices that meet all the required criteria for readiness will be available for selection. Invoices not meeting the criteria will remain in Pending status and cannot be selected for creation. |
4.1. Ready Invoices
Navigation: Global Level > Finance > Suppliers > Invoice > Draft tab
Next to each draft invoice card, there will be a tickbox. Only if the invoice is in a Ready status, the tickbox will be clickable. If there are still required actions the tickbox will not be able to be selected to be created.

Once selected, a Create button will appear on the Draft page. There will be an option to Select All Ready Invoices for bulk creation.

Once the Create button is clicked, a success message or loading indicator will display while invoices are being processed.
| Note: The display and timing of this process may depend on the Volume capabilities. |
Once the draft invoices have been created, they will automatically move from the Draft section to the Created section
| Important: Duplicate Checks: No duplicate validation is performed during bulk creation. Duplicate checks occur only when saving a draft. Always review the draft invoices before bulk creation to ensure no duplicates or errors exist. |
4.2. Delete Draft Invoices
Navigation: Global Level > Finance > Suppliers > Invoice > Draft tab
Next to each draft invoice card, on the far right on the menu options button, the option for Edit or Delete the draft will appear. Only draft invoice cards which is marked as Ad-Hoc can be deleted.
If a draft invoice card is a Fixed or Variable the recurring supplier invoice template will need to be adjusted.

| Note: To be able to delete a draft, the necessary permissions needs to granted. |
5. Additional notes when the using AI Invoice Assistant
5.1. References
If no supplier reference is available, but the Community Code Reference appears, that will be used. If neither is found, the Source Document Number will be used instead.
5.2. VAT implications
If the Community is VAT registered, the AI Invoice Assistant will calculate and populate:
- VAT Amount
- VAT Type/ Percentage
- VAT Exclusive and Inclusive amounts
If the Community is NOT VAT registered:
- All VAT-related values will be ignored
- Only VAT-inclusive amounts will be used for line items
| Important: If a draft invoice is generated and the selected Community is later changed on the draft page, the Solution will respond as follows: 1. Supplier and Ledger Reset
|
Was this article helpful?
That’s Great!
Thank you for your feedback
Sorry! We couldn't be helpful
Thank you for your feedback
Feedback sent
We appreciate your effort and will try to fix the article