Add Supplier Invoices
Navigation: Global Level > Finances > Supplier > Invoice > '+' (Add)

There are two options available to create Supplier invoices:
- Standard Supplier Invoicing
- Ad-hoc Invoice - Manually capture and create a new supplier invoice.
- Import Bulk Invoices - Upload multiple invoices at once using the Excel Bulk Invoice template.
- AI Assistant Invoicing
- Upload Files - Using the AI Invoice Assistant to process PDF and Word Document containing invoices. This can only be done for Bulk upload invoices.
1. Standard Supplier Invoicing
Navigation: Global Level > Finances > Invoice > '+' (Add)
1.1. Ad-hoc Invoice
On the right-hand side, click on the '+' button. A pop-up will appear where the details for an ad-hoc invoice will be captured manually.

| How to make use of the Invoice Preview Function: on the pop-up screen click on > drag and drop or browse to upload the individual supplier invoice. It will display the supplier invoice on the left side of the screen. |
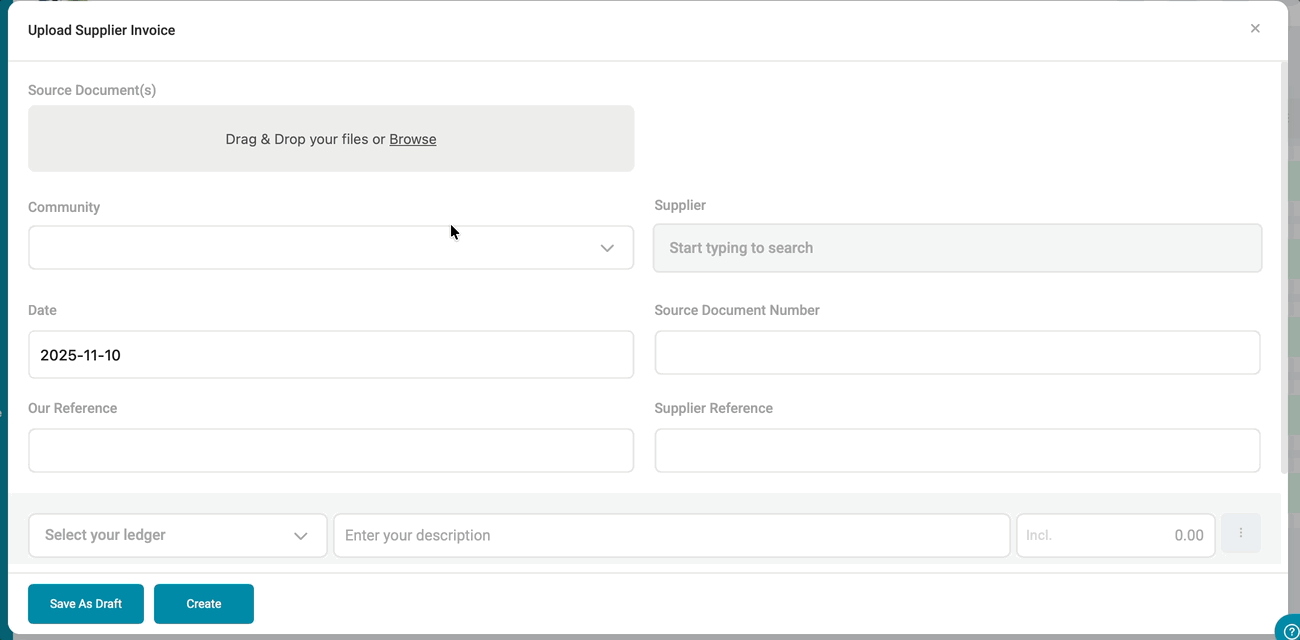
Manually Capture the following fields:
- Community: Select the Community in which the invoice should be processed.
- Supplier: Select the supplier as per the invoice received - the supplier must be verified.
- Date: Select the invoice date.
- Our reference: Best practice would be to use the supplier code hyphenated to the invoice number received:
- e.g., SUP001 - INV001 - this will allow for automated allocation of supplier payments.
- Supplier reference: the reference that will reflect on the supplier's bank statement.
- Invoice line items: with selected ledgers, description, VAT if applicable, and amount.
- Upload Files: This comes in handy when Trustees need to authorise payments and they can view the original invoice. Only two supporting documents can be uploaded.
At the bottom of the pop-up, two options are available:
- Save as draft: Saves the input as a draft. This does not create an invoice on the Solution yet.
- Create: Finalizes and creates the invoice (GRV), which will pull to the Payments page.
| Note: Drafts can be edited or completed later. Once an invoice has been created, it will follow the standard approval or posting workflow. |
2.1.2. Excel Bulk Invoice Template
Navigation: Global Level > Finance > Suppliers > Invoices > Menu Option > Import Bulk Invoices

Download the template by clicking on the Download bulk invoice template option in the pop-up screen.

An Excel document will be downloaded, which will look similar to the following.

- Column A: Insert the relevant community code
- Column B: Insert General Ledger Code - example 2000/007
- Column C: Insert Date in format yyyy/mm/dd - format the cell to text first
- Column D: Supplier Code on WeconnectU.
- Column E: Amount (VAT incl.)
- Column F: Description of invoice
- Column G: Our reference. Best practice would be to use the supplier code hyphenated to the invoice number received"
- e.g., SUP001-INV001 - this will allow for automated allocation of supplier payments.
- Column H: Supplier reference the reference that will reflect on the supplier's bank statement.
- Column I: VAT (Y/N)
- Column J: Source Number optional - this is the invoice number
Once all the relevant information has been added, please save the Excel document and upload it on the pop-up screen.

Note: You CANNOT add any additional files. Following these steps, the Solution will assume this upload is for bulk creation. |
Once the file has been uploaded, a summary will appear reflecting all the invoices that will be uploaded from the Excel file.
Was this article helpful?
That’s Great!
Thank you for your feedback
Sorry! We couldn't be helpful
Thank you for your feedback
Feedback sent
We appreciate your effort and will try to fix the article