Before any communities are added, users should begin by establishing their Company Profile. This foundational step ensures a professional and organised account structure, serving as the primary hub for managing and communicating with future communities.
The following guide details the process of building this essential foundation before moving on to community integration.
TABLE OF CONTENTS
1. Company Details and Logo
Navigation: Global Overview > Click on Settings > Company
Here the Company Details and Logos will be uploaded. From here the following details will be populated.

- Reseller Name: This will be the company name.
- Company Reg No: Company's registration number.
- Transfer Clearance Fee: The Rand value that the company charges for Levy Clearances.
- Telephone No: Company's telephone number.
- Outgoing Email: This is the email address that all of the emails will be sent from when sending emails from the system. We suggest that either an "admin@..." or a "noreply@..." email address here.
- Banking Details: Company's banking details. These details will apply to the levy clearance.
On the same screen, upload two logos: the "Header Logo" and the "Top Left Icon".
The Header Logo is the logo being displayed on all of the Invoices/Statements/Supplier Invoices and all other documents. We suggest the following dimensions: 600 x 200. It is not a strict rule, but more of a guideline.
2. Message Setup
Navigation: Global Overview > Settings > Communication
To increase the deliverability of the emails from the WeconnectU system, it is strongly advised to add these 3 records to the DNS. Please let us know when this has been done, so that we may verify and complete the process.

From this screen, the company's default email header and footer can also be uploaded, by clicking on the icons below:

Email setup to the right can be disregarded for now as this will be done during the Arrears setup.
CMS - How to: Set Up Arrears Notice Messages
3. Default Ledgers
Navigation: Global Overview > Settings > Default Ledger
The default general works the same as the Default Chart of Accounts. This would have to be set up BEFORE creating any communities. The default ledger which has been created on set up will be the default general ledger for all future communities added.
Note: Once all communities have been created, any new ledger added to the Global Ledger must be manually added to each existing community. |
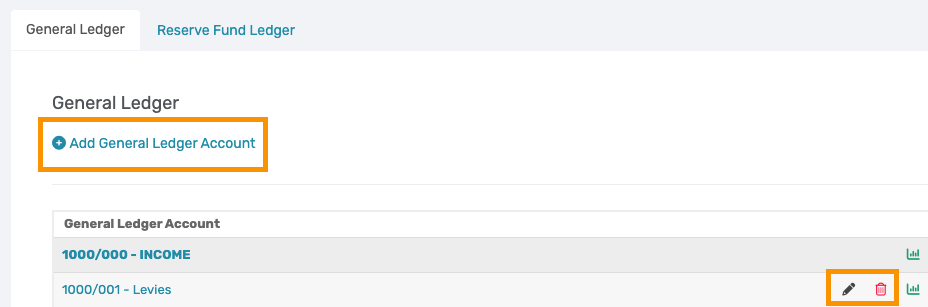
The following options are available:
1. Add General Ledger Account: A new ledger can be created when there is a need to record or track processing separately.
2. Editing General Ledger: Where possible, avoid adding or deleting a ledger. Rather, rename the existing ledgers.
When the pop-up appears, amend the fields that are not greyed out and select Update Account to apply the changes.

3. Delete General Ledger: This will remove the ledger and sequence from the Solution and can not be reverted.
Important: If there is any processing done in the General Ledger Account it cannot be deleted. When deleting a General Ledger the GL account number which was allocated to that ledger will be removed and the next GL added will have the sequential GL account number. That deleted account number will no longer be available for future use and cannot be reinstated. |
Was this article helpful?
That’s Great!
Thank you for your feedback
Sorry! We couldn't be helpful
Thank you for your feedback
Feedback sent
We appreciate your effort and will try to fix the article